What is Reverb?

Reverb occurs when sound reflects off surfaces like walls, ceilings, and floors. These reflections reach the microphone slightly delayed, creating an echo-like effect.
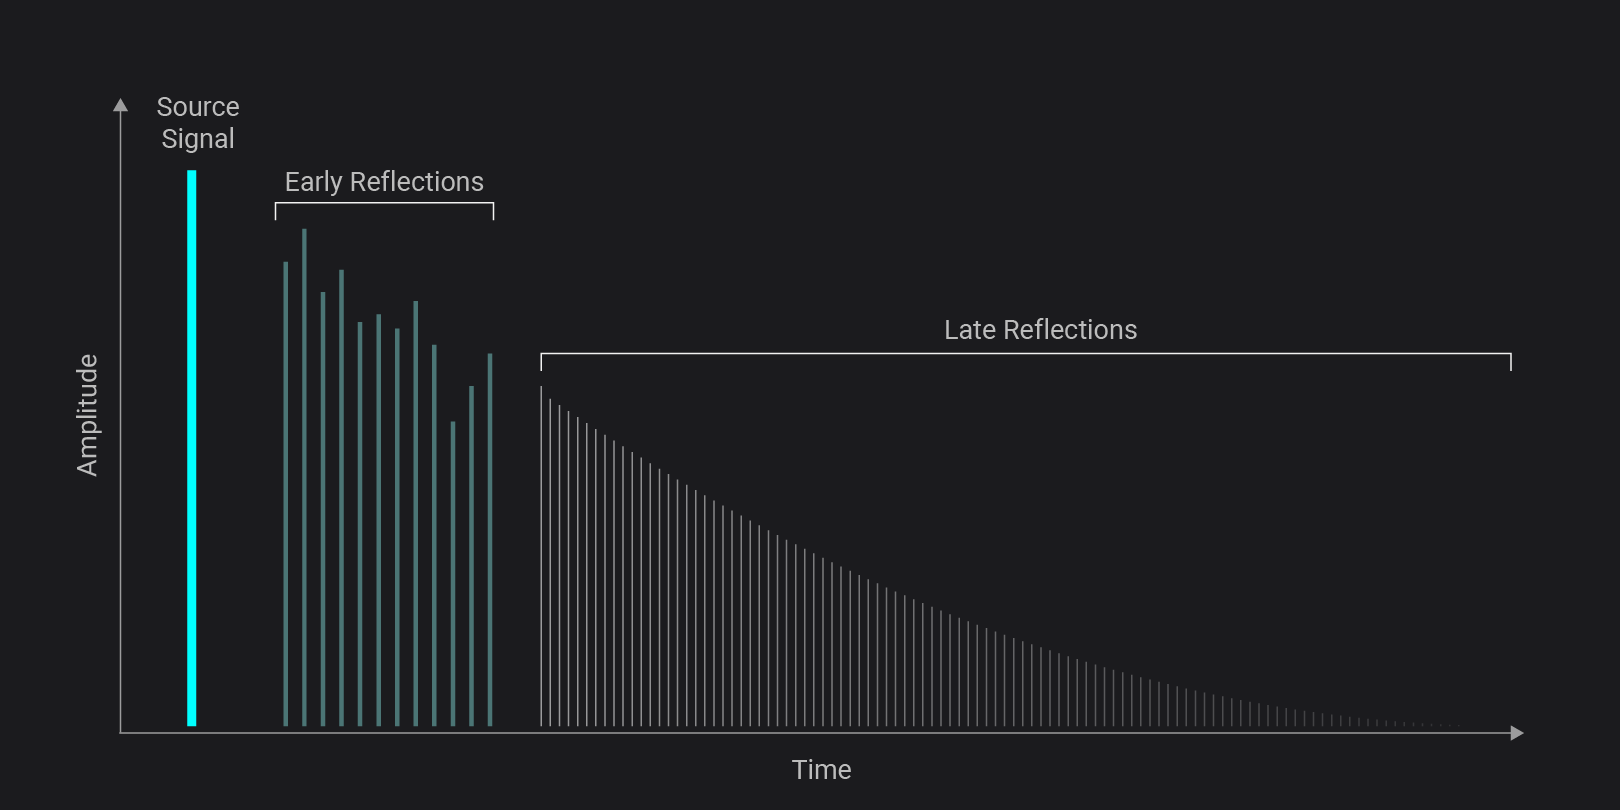
 

Source Signal

Imagine singing in your shower: Your vocal chords produce a melody, turning your body into its source. The sound leaving your mouth is your original, dry voice. It travels straight to your ears (or a microphone) without bouncing around first. This source signal is the direct sound of you singing before the room affects it.

Early Reflections

Right after your voice leaves your mouth, it hits nearby surfaces. These reflections arrive within milliseconds and are therefore called early reflections. They are still quite clear and help your brain understand the measurements of the room. Bathroom walls are usually tiled and hence not very absorbing. So most of your signal will bounce off, turning the walls into secondary sound sources that keep sending the signal to other walls and so on.

Late Reflections

After many more bounces, the sound becomes dense and blurred together. Individual echoes are no longer distinguishable and the sound slowly fades out over time. We call this late reflections or reverb tail.

Together, these three elements—source signal, early reflections, and late reflections—form the complete reverb experience. They shape how we perceive distance, environment, and emotion in sound, turning a simple voice into something that feels alive within a space.

Remove Reverb from Audio | Try Accentize dxSplit & DeRoom

When Do You Need to Remove Reverb from Audio?

While some reverb can add atmosphere, too much of it can:

  • Make voices sound distant
  • Reduce speech clarity
  • Create an unprofessional sound
  • Make dialogue harder to understand

This is especially common when recording in untreated rooms, large spaces, or environments with hard surfaces.

Common use cases for reverb removal

You may need to remove reverb if:

  • Your voice sounds echoey or “roomy”
  • Dialogue lacks clarity in videos or podcasts
  • You recorded in a large or untreated space, but the room is too distracting
  • Interviews or voiceovers sound unprofessional

These issues are common for content creators, filmmakers, and podcasters working outside of studio environments.

Before vs. after reverb removal

The difference between untreated and cleaned audio can be dramatic.

With reverb removal:

  • Voices become clearer and more present
  • Background reflections are reduced
  • The recording sounds more professional

Listen to the following examples: The original speech recording has been made in a big underground parking lot, resulting in noticeable reverb. Do you hear the difference de-reverbation can make?

Original Audio with Reverb

Extracted Audio without Reverb (using dxSplit)

You can go even further and remove background noise from your recording. This step is especially helpful when you need to improve speech clarity:

Extracted Audio without Noise and Reverb (using dxSplit)

How to Remove Reverb from Audio

Method 1

Manual Audio Editing in your DAW

Quick Tips

  • Work in small adjustments—subtle changes add up
  • Always A/B compare with the original
  • If you can’t remove it completely, make it less noticeable

1. EQ (Clean Up the Room Sound)

  • Apply a high-pass filter (~80–120 Hz for vocals)
  • Cut muddy low-mids (200–500 Hz)
  • Slightly reduce harsh highs (5–10 kHz) if needed

2. Volume Automation / Clip Gain (Most Effective)

  • Lower volume between phrases
  • Reduce reverb tails manually
  • Use smooth fades to keep it natural

3. Noise Gate (Control the Tail)

  • Set threshold so gate closes after the voice stops
  • Use fast attack, natural release
  • Avoid aggressive settings (can sound choppy)

4. Transient Shaper (if available)

  • Increase attack slightly
  • Reduce sustain to suppress reverb

5. Multiband Compression (target problem areas)

  • Focus on low-mids and highs
  • Apply gentle compression where reverb builds up

However, this approach has several drawbacks:

  • Requires advanced audio knowledge
  • Time-consuming workflow
  • Often results in unnatural sound

Method 2 (Recommended)

Use a Reverb Removal Plugin

The easiest and most effective way to remove reverb from audio is by using a de-reverb plugin.

Modern AI tools can detect and reduce room reflections in seconds while preserving the natural tone of your recording. This makes them ideal for both professionals and beginners.

Which Plugin should I use?

This depends on your use case:

a) Remove Reverb only

If your main goal is to remove reverb from speech- or instrument recordings, try a plugin that lets you

  • create a dry sound
  • listen to single frequency ranges in solo-mode
  • control Attack & Release
  • visualize spectograms & waveforms
  • listen to before/after versions
b) Remove Reverb & Noise from Speech Recordings

If you aim to improve dialogue audio, use a tool that

  • focuses on Reverb AND Noise Reduction
  • lets you edit voice, reverb and noise seperately
  • provides faders and EQs to finetune voice, reverb and noise individually

Tips to Avoid Reverb in Future Recordings

While software can fix reverb, prevention is important, too!

Here are some simple tips:

  • Record in smaller rooms
  • Use soft materials to absorb reflections (carpets, curtains, foam)
  • Avoid hard reflective surfaces
  • Position the microphone closer to the speaker

Best Way to Remove Reverb from Audio

For best results, use an AI-powered plugin like DeRoom or  dxSplit.

It’s designed specifically for dialogue processing and can:

  • Remove unwanted reverb and echo
  • Improve clarity and presence
  • Enhance recordings instantly

Try dxSplit now and hear the difference in seconds

Remove Reverb from your Audio

Room Resonance Suppression

Reverb Removal for Speech & Instruments

Fast and clean results with machine learning

Improve your Voice Recordings in Seconds

High-quality noise and reverb reduction

Real-time capable algorithm

Individual parametric EQs for every channel

Can you completely remove reverb from audio?

It depends on the method you use: Reducing reverb manually is possible, but requires time & experience. Modern AI tools on the other hand can significantly reduce or remove reverb while maintaining natural sound quality.

How can I prevent reverb while recording?

  • Record in smaller rooms
  • Use soft materials to absorb reflections (carpets, curtains, foam)
  • Avoid hard reflective surfaces
  • Make use of what you have at home: Create absorbers/diffusors from mattresses or book shelfs
  • Position the microphone closer to the speaker

Do I need professional audio skills?

No. AI tools like dxSplit are designed to work automatically, even for beginners.